ScanNCut: custom vinyl fun

I’ve got a confession to make – I’ve become totally obsessed with all things vinyl.

I was making some projects for Brother (usual disclaimer that I’m a paid consultant for Brother, but all ideas & opinions are my own – LOVE the ScanNCut! Note affiliate links are used in this post) and vinyl was a good choice of material. I checked out Julie Fei Fan Balzer’s videos on the topic – specifically an umbrella. Armed with great tips and an initial idea, I got to work!

I’ve quickly become absolutely obsessed with making my own vinyl stickers. A few reasons I’m loving it?

  • Quick and easy – no adhesive needed
  • Adds new possibilities (onto glass, plastic, etc)
  • Expands what I can do with my ScanNCut

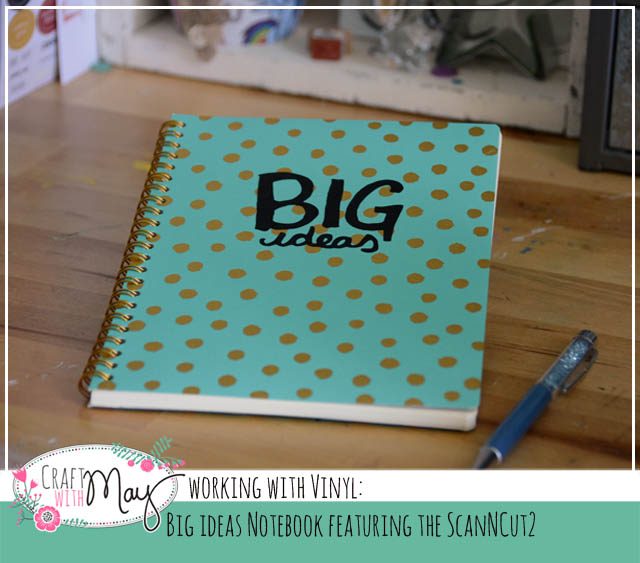
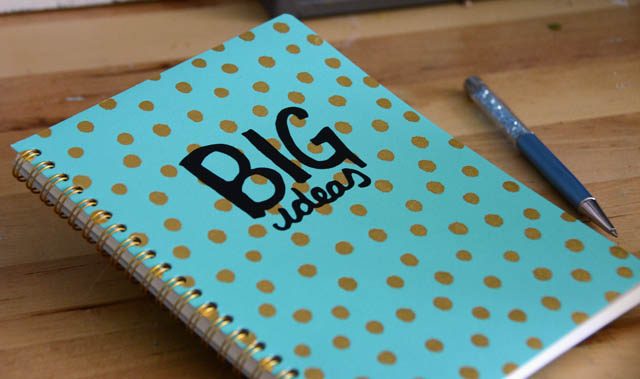
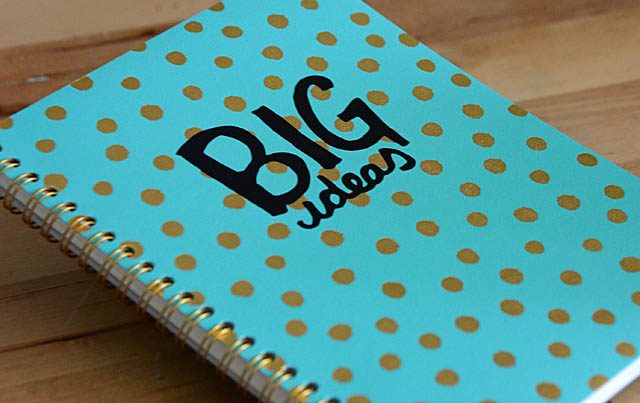
In short, now that I’ve begun I can’t stop! Today I’ve got a video to share showing how I took a doodle and turned it into a sticker perfect for my notebook!

I was able to adjust the size to be exactly what I wanted – and no pressure because I could doodle until I had it just right. Speaking of love – the ScanNCut has a great deal going right now! $50 off the CM350 (here’s a link to amazon) for a limited time.

I’m consistently amazed by how many things I come up with and continue to do with this machine – new ideas and materials to test all the time!

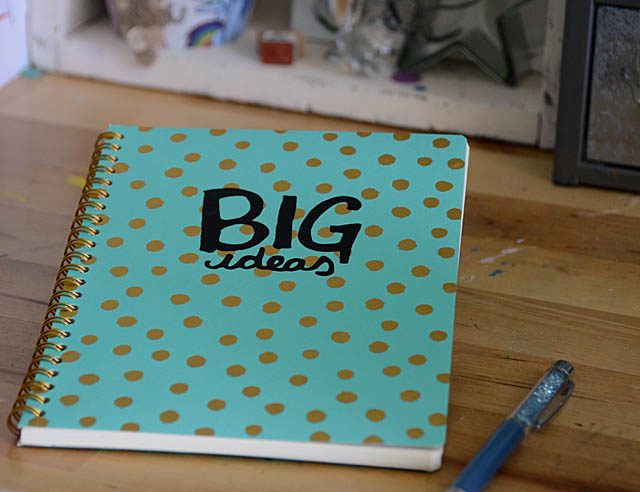
I have a lot of ideas for creating some custom projects – including new pencil cups for the kids, a makeover for a boring stapler, and I’m thinking about some laptop top decorations as well. So much fun! I used black vinyl and transfer sheet by Brother – though you do not need to use their brand of product any brand should work in the ScanNCut.

The vinyl used here is indoor/outdoor “regular” craft vinyl. One word of caution – I did buy some beautiful mint color vinyl at the craft store last week… and realized today that it’s “iron-on”. WHOOPS! That will work but not what I had in mind at all so it’s good to be sure you double check what type of vellum it is and know there are different styles as well as colors. Lesson learned – now I’m off to dream up some new concepts for vinyl!

gold leaf scrapbook title featuring the ScanNCut

When I scrapbook, the process goes photo + story sorted out then I figure out what room is left for embellishing (paper layers, metal bits, buttons, title, etc). Today I am going to share a layout that is the total opposite! Using my ScanNCut (disclaimer, as always that I am a paid consultant for Brother, but all ideas and opinions are my own) I created custom letters which I cut out from paper covered with double sided adhesive… and wow.

I made a YouTube video to better explain how I made my title. This was a lot of fun to do. Note I used double sided adhesive sheets which had covering still on the side not adhered to cardstock so that I could cut them without any “sticky” situations. Continue reading “gold leaf scrapbook title featuring the ScanNCut”

Inspired by: Julie Fei-Fan Balzer

What to do about Wednesday? For the next month I’ll be sharing a person who inspires me, and a technique, idea, or project inspired by them! Today I’m kicking it off with an artist who is also a friend, and someone whose work, personality, and general awesomeness I always admire: Julie Fei Fan Balzer!

One way she inspires me is through her ScanNCut knowledge and projects. If you’ve got a ScanNCut I strongly recommend looking through her projects on her blog (here) and her many fantastic tutorials too. Before we go further I will disclose (as I always do!) that I am a paid consultant for Brother, but that all ideas & opinions are my own. Julie is in fact the spokesperson for the ScanNCut – you may have seen her on TV before either her Make it Artsy TV show or on QVC with the ScanNCut!

The challenge for today: make a doodle

You don’t have to make it into a project, it doesn’t have to be “good”. NO pressure! If there’s one thing I’ve learned from Julie over the years it is the importance of daily practice and making time to try new things, and to improve/work on skills. I doodled a number of things but my favorite was this flower.

This layered paper flower began as a doodle – I explain (and share the how-to) here in this YouTube video.

I love how this turned out and I love saving it as both just an outline and as the full doodle so that I can play with layering and depth even more! Now I ended up placing this on a birthday gift bag just perfect for a special friend – but this is one of those experiments that could be used for many things from making a stencil to a stamp, scrapbooking to playing in a planner!

I am reminded that we don’t always need to have a finished project or an end goal in mind when we create. Sometime we can simply doodle and play. Enjoy the process. And just have some fun! I hope I’ve inspired you to do just that this week.

Treat Yo Self: DIY pottery fun

I’ve talked about it before – but oh boy do I love when an assignment from Brother launches an idea. In this case? I’m pretty sure it’s launching a whole series of fun. The possibilities have only just opened up and I can’t wait to try again. What am I talking about? Well as I always disclose I work with Brother specifically the ScanNCut (though all ideas & opinions are my own) and sometimes they ask me for a specific project or technique for their website or use at trade shows, HSN, etc.

Well they wanted to see… could I do something with a stencil and pottery? Oh now that’s a fun thought. I don’t know, can I?

The short answer is “oh yeah”

The longer answer is yes, but there are some things you’re going to want to know:

  • This works best on a flat surface
  • you’ll want to bring plenty of extra shapes/stencil pieces just in case
  • Think about the finished color, and work backwards. Whatever color you put down first will be seen the least.

I filmed the whole process at the pottery studio as well as here at home prepping the stencils here is my YouTube video.

There are so many options – and one thing I want to work out is how to better work on curved surfaces. I’m thinking the answer is my massive shapes were just too much and small shapes would work better.

Above you can see my little station – I just sat at the window snapping photos, filming, and creating away! The tips I was given by the lovely lady who runs this studio were:

  • white base first if you’re going to have any white show first
  • if you have some boo-boos the paint scrapes off really easy. Don’t worry!
  • Keep in mind unless you go really thick, under colors may bleed/show through somewhat

Ultimately I had a blast with this project – and I love how it turned out. I did learn I need to be more patient about waiting for layers to dry (it’s so hard!) but I love that I can get funky looks and I can’t stop thinking about the designs, phrases, and options. Scrappy could have a custom dog bowl. I could have a “mad hatter” inspired tea pot. I could create Christmas plates and platters with favorite movie quotes or song lyrics. The list goes on as long as my imagination!

This particular piece is a wedding gift, someone who loves this saying and will really appreciate that it’s handmade as well as having a quote/saying from a beloved TV show. If you have experience painting pottery pieces, or stenciling with them in this way I’d love to know your tips or best advice! This was just so much fun I really can’t wait to try another round.

ScanNCut.com projects: three favorites

As you know  (since I always disclose it) I work with Brother, specifically with the ScanNCut. It is my honor and pleasure to create all kinds of projects for their website, trade shows, and use on TV (as well as some that I share here!) and to challenge my creative limits. But did you know that the ScanNCut website has TONS of free downloadable project PDF files as well as videos?

Today I want to share three favorites of mine that I have up there. To find any of these or dozens of other projects just visit the videos page (link) or the project PDF page (link).

One of my most recent creations – a bouquet of paper flowers!

While I do a lot with paper flowers, I don’t often layer them in this way so it was a lot of fun to create and play with them – as well as discovering that buttons are in fact a FANTASTIC way to anchor and keep them all safe. This project has a video (video page) as well as a project PDF. I love that both versions are offered so you can choose what works best for you, or watch a video then go download the PDF and print it for future reference!

Speaking of the future – I was asked to make a pop-up card suitable for celebrations/graduations/etc.

My favorite part of this project is the stars. The glitter ones (cut out of super thick glitter paper – glad to get it used!) and the “star within a star” outline ones most especially. Basic shapes such as stars, hearts, and flowers are a signature of my crafting style so I always love challenging myself to find new projects and ways to use them!

Speaking of challenges – about a year ago I was asked to make a cover for the ScanNCut – and a tutorial. EASY! I thought. Well if you go and read my tutorial or watch my video it is in fact easy. What wasn’t easy is getting it to the point that it a) worked and b) the process made sense in a way that I could explain it for anyone else to follow along.

This was definitely the most complex sewing project I have ever successfully completed – and I am proud of that! I really believe in challenging my mind creatively and I am so very glad I got this assignment. If we are not testing our own limits, challenging our own “I can” boundaries – well we will never grow or improve in any way!

Whether you have a ScanNCut machine or not – I hope that you’re inspired by all of these projects that are available for anyone to view and learn from. I love how much free education and inspiration Brother provides – just one of the reasons I’m happy to say I work with them. When I need inspiration I like to check out the other brand ambassadors projects (Erin has a recent travel journal, Julie has an Eiffel Tower project that I want to try…) and see what they’re up to as well.

What creative limits have you pushed recently? Do share!

full disclaimer as always that I am a paid consultant for Brother, but all ideas and opinions about this awesome machine and all their products that I use and love are my own.