Scrapbooking 101: The basic tools

A while back I was reading an article about getting started with scrapbooking and it made me so mad! There were so many extras listed, so much fuss – and really scrapbooking is this simple:

paper + glue + photos + album

You could, in theory, scrapbook without so much as a pair of scissors. Not that I recommend the approach, but my point is that it does not need to become this huge beast of a hobby! You can keep it as simple as you like. As I revamp and revisit my own scrapbooking habits I also want to share with you a series of articles that I hope will shed light and possibly help you if you are someone getting into this hobby. Note that affiliate links are used in this article. Long time scrapbooker? Do add your tips and suggestions to the comments!

The tools I recommend

  • Good cardstock – acid free, thick/high quality
  • Paper Trimmer -Fiskars Rotary for longevity, cheap ‘chip blade’ style any brand if just going for short term use
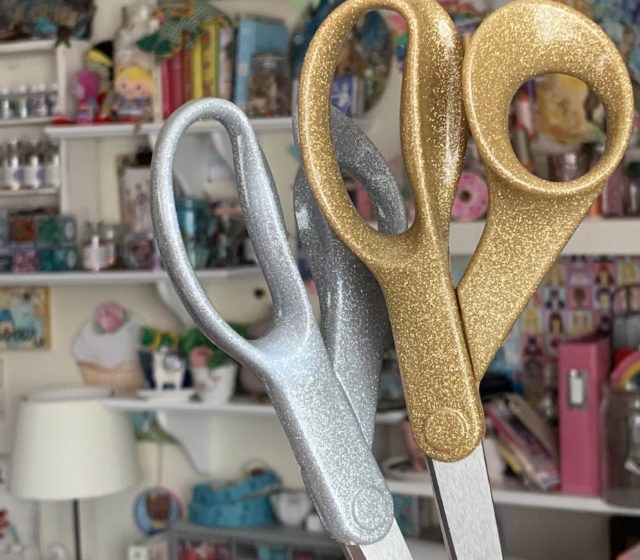
  • Quality Scissors -Fiskars
  • Acid Free adhesive- tape runner of your choosing and PPA liquid
  • Archival black journaling pen
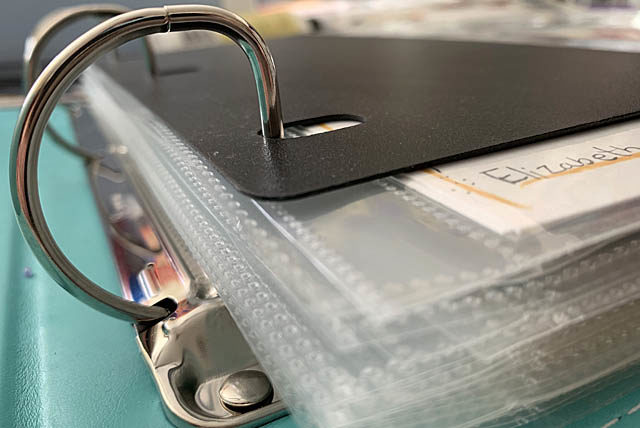
  • Ring bound scrapbook album in the size/format of your choice (watch for my “how to decide the size” article coming soon!)

You can find most of the items I mentioned at a local craft or scrapbook store, or online. I have linked most of my picks (and I always am adding!) on my Amazon craft suggested products list as well. Want to take it a bit further and beyond absolute basic? Next steps I would get into:

  • Black, white, metallic colored alphabet stickers
  • a “pack” or “kit” of coordinated paper and embellishments that goes with a current batch of photos/project you’re working on
  • Black archival ink and 1 word/phrase stamp set to see if you’ll use it!

What do I not recommend? For scrapbooking or any new hobby, don’t dive in wallet first. While things like paper punches or stamps or piles of patterned paper and stickers might seem appealing, you may discover that you prefer digital scrapbooking, a clean style, or even that you’d prefer making your own custom embellishments with an electronic die cutting machine! Save money and stretch your creativity especially at the start.

I think of it like when I’m shopping for clothes. Oh sure I love lots of purses or bracelets or shoes or fancy tops… but will I use them? Actually wear them? That difference between “ooh I like —” and “I will use —” is a key thing to know, watch, and respect as you shop for your crafting supplies to be sure.

In this series of articles I will be covering how to work with a limited set of supplies, design basics, work flow and album organization, and much more! I hope you’ll stay tuned and I hope you’ve enjoyed this article. Please do feel free to let me know topics you’d like me to cover in the future as well.

This week in my scrapbook: anniversary inspired

This weekend we celebrate our wedding anniversary, so I thought a layout of me and Jason would be fun to share!

My page was made with Vicki Boutin paper (isn’t it fun?!), and assorted stickers and embellishments most of which can be found at (affiliate link) Scrapbook.com

I love that this paper let me start with a quick base, and then I just added stitching, embellishments, and a few words. I created a 15 minute page and off I go! Such fun, and a great way to work in some quick crafting on a busy week too. Until next time – have a great weekend!

This week in my Scrapbook: New chapter

I am excited to bring you a new (most every week) blog series where I will share what scrapbook page I’ve made this week! My goal is to really share more of these, as well as the stories, techniques, and tips behind the page! This week I’m adding an exciting entry about our current horseback riding lessons routine, as well as the horse she’s currently learning on!

Things that went wrong:

  • none of my papers with red quite worked, they all took over too much, so I went to blue
  • I stuck down a journaling sticker (journaling written down already) and the entire paragraph SMEARED! So… the “hello” pocket and other embellishments on the right covered it up!

I like how this (4×6 photos) turned out! You’ll notice that I kept my embellishments and details fairly contained – while it seems random it really isn’t. I call my style carefully controlled chaos. I like to have fun, but never at the expense of the overall design!

Things that went right:

  • Simple design is always best when you want to add lots of bits and pieces
  • Don’t have lined journaling paper the size you want? Just add your own lines!
  • LOVE the clusters and how that looks
  • Used up a good morning sticker since it coordinated with the lesson time!

Most of the supplies I used are American Crafts, specifically Maggie Holmes/Crate Paper. (affiliate link) Scrapbook.com is where I get most of my A.C. brand goods as they tend to carry it all!

The horse show season is about to start up, so that means lessons won’t get to be as regular (her instructor travels a great deal) – so this layout is well timed to reflect the winter schedule. When I do a page like this I put it into my annual album as it shows chronologically things going on. Not that I complete pages in that order – but I store them that way so going back over the albums viewing makes a lot of sense and shows where we were at in those times.

Have any questions or future scrapbooking topic requests? Do share! I will be posting a new page (most) every week!

Scrapbooking sports: approaches & tips

“How do you handle scrapbooking kid activities/sports?”

This is a question I get a lot, and honestly it’s pretty simple. I look at the event/season/situation and decide the approach that makes the most sense for me and the stories to be told. The most important things to remember are that you don’t have to use sports themed anything, and you don’t have to use a lot of photos if you do not want to.

Continue reading “Scrapbooking sports: approaches & tips”