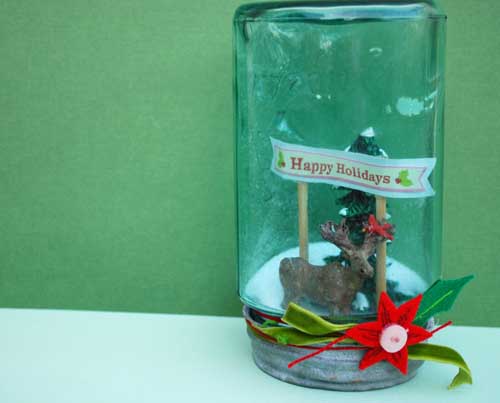
day 14 | faux snow globes

I created a video tutorial for an article that just posted at scrapbookupdate.com all about my new favorite project – snow globes!

Well to be honest, they’re not real ones. No water or fluids, just a cool scene and glitter.

 This one has been on display a little over a week now, and gets lots of attention from my girls + comments from visitors too. A one of a kind, easy, fun, and looks great on display decor piece! I can not wait to make more.

Here’s a link to my article that has the how-to video: http://www.scrapbookupdate.com/2011/12/08/video-diy-mason-jar-snowglobe/

day 13 | the projects don’t all work.

I have not been happy with my attempts at banners. They simply aren’t working in the way I envision them, and for now I am tossing the project aside. Perhaps I’ll re-visit at Valentine’s Day time or Easter.

Know what? that’s alright. Because mistakes, projects gone bad, and hideously ugly creations are a part of my process.

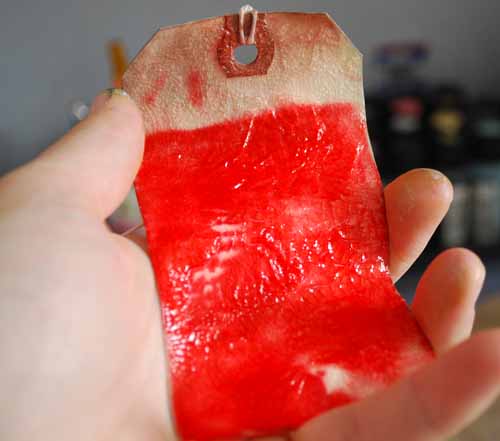
Above is a die cut snow globe gone wild (in the worst sense). Oh yeah. Using photo paper because I’m too lazy to figure out where I have white cardstock… well… sometimes things do NOT work as substitutions. SO noted that my rock candy crackle paint doesn’t like to play with that particular paper. It’s like a nasty sunburn or something… so gross…

Y’all know that you have to be careful when stamping with distress inks and you don’t let it dry/set and instead in your big hurry apply rock candy distress crackle paint right away. You know it’s gonna bleed out until you can’t see the image, right?

*NOW I REMEMBER THIS*

These are just three of today’s examples of crafting gone bad. That’s alright. It’s cool baby. I have had a few “HEY! mine didn’t turn out like so-and-so’s” moments too – in which I realize I didn’t follow directions.

Sometimes that leads to AWESOME things…

Like my first tag inspired by Tim’s 12 Tags of Christmas. I got all mixed up, ended up adding steps that aren’t there… and it WORKED. I LOVE IT. I will be sharing a full how-to this weekend because I have two other posts that are going up (also GOOD things) before it!

Just remember – the goofs can lead to good things – so enjoy the process…

day 12 | using scrapbook product off the page this holiday season

Today Nancy and Melissa (aka the other contributors to Nancy’s site ScrapbookUpdate.com) are also blogging about using scrapbook products “off the page” this holiday season. Be sure to check out their blogs for their ideas!

This time of year – nothing is off limits. I’m yanking silk flowers out of arrangements to use on gift wrap, stamping onto brown paper bags to create custom wrapping paper, using patterned paper in place of ribbon.

In other words, when it comes to crafting supplies – the walls are torn down! I’ve been sharing my crafty adventures (25 days worth!) you can see the archives here: http://mayflaum.com/category/25-days-of-holiday-crafting-2011/ There is still much to come, today I want to look specifically at how I use my scrapbook supplies off the page:

Above you see a wrapped gift… done almost entirely with craft supplies! The paper I use (and most often use) is just a roll of kraft paper you can find at any craft store. A shopping bag works too. From there I built with my crafty stash. Patterned paper, stamped tag, die cut patterned paper, paper rosette… even the doily and ribbon are from my scrapbook stash!

The biggest thing to remember is this: use what works. Sometimes that fancy (expensive) “gift wrap” product is something you as a crafter have, or can quickly DIY.

shown above: a package arrives at my house with baker’s twine (trendy SB product!) + stamped image wrapped in kraft.
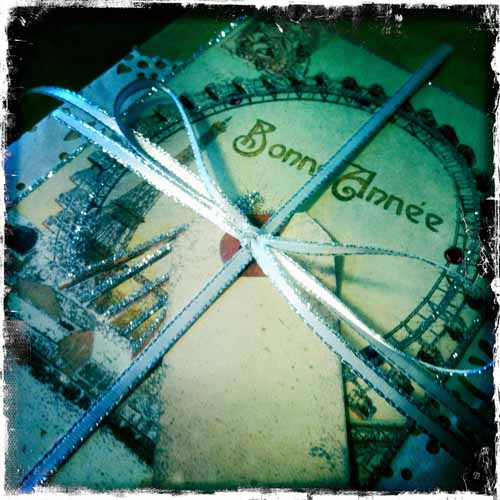
Above you see a glittered postcard (here’s a link they’re on sale at amazon right now – LOVE Cavallini postcards) I purchased these to use both on gifts and in my scrapbook. LOVE products that are multi-purpose.

Where else can you use crafty products? Anywhere really! Here’s a list of some other favorites:

  • table settings [napkin rings, place cards, centerpiece, table runner (paper!) or place mats]
  • ornaments
  • wall decor
  • altered items [wood items, re-purposed, etc]
  • other items for decor [configurations boxes, mini books, etc]
  • cards & gift wrap
  • garlands
  • punch “confetti”

The best thing about all of this for me, is maximizing my budget AND using up what I already own. *LOVE* the budget aspect. I can make stuff for SO MUCH LESS than buying so much of the time!! I made myself a very quick & easy table runner from 2 pieces of fabric (minimal sewing too) from stuff I already had for a dinner party last weekend.

 I also used some Tim Holtz die cuts to create quick and easy place cards that I set on the napkins

I edged the snowman die cut in faded jeans ink, used a banner die cut for the name, and my white sakura souffle pen to write the name. Simple, but it added to my blue & white “winter” table better than anything I could find to purchase.

Customization and total control – another reason I love cardstock and die cuts AND bringing my craft room out into the house this time of year. Semi-homemade and DIY craftiness does not have to take a lot of time. You can do things quickly and on a budget, and have fun too.

Personally, nothing makes me happier than seeing my craftiness in use and being enjoyed by friends and family.  I’m off to make my first paper banner of the season – I will share that how-to, as well as an apron tutorial and more later this week.

Reminder: Check out Melissa & Nancy’s blogs for their ideas too:

http://www.scrappyjedi.com/ 

http://www.thenallynotes.com/ 


first days of (a very crafty) december.

I’m 3pgs into my “december daily”, which I think is an AWESOME start. Especially since it was an insanely crazy weekend – so much so that I did not once turn on my computer!

As I said before I’m not doing “Daily” yesterday inspired 3-5 pages. Many of those will simply be recipes. Here is one I just made sitting down with my morning coffee instead of surfing internet. It took 9 minutes. I printed it out, I can add product to it now if I want. LATER. For now, it’s in the album and my Barefoot Contessa love is documented:

I did this in Microsoft Word, added in the www.rhonnadesigns.com birdie + the image of my tea crackers. The image was so grainy and poor, I decided rather than try and print at a larger size and add later I’d just print it onto cardstock with the rest. (cream cardstock used).

I love documenting recipes I’ve used, and WHY/what reason I first used them. This is one I’ll revisit. The spread is AMAZING. Here’s a link to her recipe.

I have other recipes I will document, I am snagging scraps of fabric from my homemade table runner to staple to a page, and other assorted details.

The #1 detail about my project DD? I AM NOT THINKING ABOUT DESIGN. Not thinking about “pretty” or “balance”. I’m treating it more journal-like. Just documenting stories + details. “Letting go” of the usual details I play with, going for pure speed vs pretty is going to ensure that I get a LOT packed into this album.

I’ve already proven to myself that this 8 1/2 x 11 album size is the PERFECT size for this. I’ve printed out 3 pages and stuck them straight in already. BOOM! That sense of accomplishment, the lack of paper trimmer so far in this project – it’s nice. I’m enjoying it tremendously and if I want to pretty something up, or make a separate scrapbook page I always can.

Other note from this weekend: I made 2 different cookies from the new Milk & Cookies cookbook (available @ amazon.com – and only like $13.50 at last check – for hardback!) it’d be an EXCELLENT Christmas gift or gift for yourself. The recipes are not over the top, AND the stuff so far is amazingly delicious. Can’t recommend it enough!!

I have a full week of holiday craftiness + baking scheduled here – I’ll be back with more soon!

day 10 | december daily album

One year I got a mini album but never did any pages.

Other than that, I’ve never tried my hand at a December Daily album. Mainly because, well, I wouldn’t do it. The “daily” aspect and numbered pages are unappealing to me, as is the pre-made page bases. FOR ME. Don’t get me wrong – I think it’s AWESOME and every year I get jealous of the ones I see. It’s such a cool thing and I adore how Ali makes it work and how inspiring she is. I just know the idea doesn’t quite fit for me and I wouldn’t enjoy doing it that way.

I was contemplating trying it my own way, an “inspired by December Daily” project, and after some thought I ordered up an American Crafts 8 1/2 x 11 album off amazon and made my plan. My book is not “my book”, it’s the family album. This is going to be an old school SCRAP BOOK – bits of life, stories, part journal and photos optional.

The photos are the tricky part. In fact they are a huge part of why I’ve never taken this on. I don’t print my own photos unless it is an emergency. I found a solution. I will cut out a 4×4 and 4×6 (to account for hipstamatic and regular prints) piece of chipboard and keep them handy. i will mark where/what photos I am using AS I GO. This way I can create and play and have fun – and I will just add in photos once or twice.

I’m really excited about this project and how much fun it will be to add in things like:

  • things the kids say
  • “wish lists” for santa
  • kid artwork
  • funny stories
  • traditions and why we do what we do
  • information about special decorations
  • a page for our holiday guests to sign/make notes
  • recipes new and old favorites
  • just for fun/because pretty art journal/quote type pages
  • notes & stories from anyone who wants to contribute

My album is ready, I have 8 1/2 x 11 cardstock purchased and ready to use. It’s going to be simple, the pages won’t be my usual “scrapbook page” looking pages. It’s going to be a new adventure. I will check in a few times when I come up with something cool or noteworthy to share.

I made a video of my creative process in making my cover – in case you want to check that out:

[youtube=http://www.youtube.com/watch?v=G6GhGJoalKQ]

Supplies used:

I am not designating a “Dec Daily” folder or box or anything. I will just use/pull whatever is out or strikes my fancy as I go along. To be perfectly honest my studio is a MESS and I have everything out already.

That said – MAD LOVE to the October Afternoon holiday line (link shown above), Cavallini tapes, and the real vintage Jenni Bowlin treats I scored. I will be using all of these things, and most especially my Green Patina perfect pearls mist – and more.

Are you taking on a big holiday craft project? I’d love to hear about it!