Tim Holtz Ideaology spooky box

DSC_6807 copy

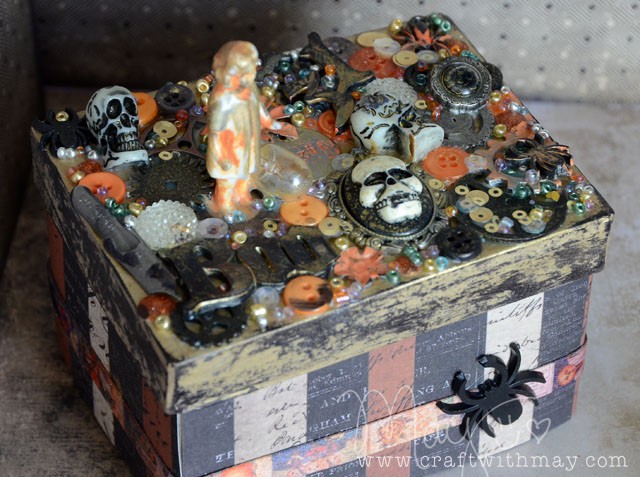
This project was the spookiest and most fun I’ve had in ages! To make your own gather some of the fabulous new Tim Holtz Halloween goodies. Wrap a paper box in paper. Paint the lid gold. Add PPA (affiliate links used – PPA is a fave and available at Ellen Hutson, Simon Says Stamp, and more) and get wild!

DSC_6488

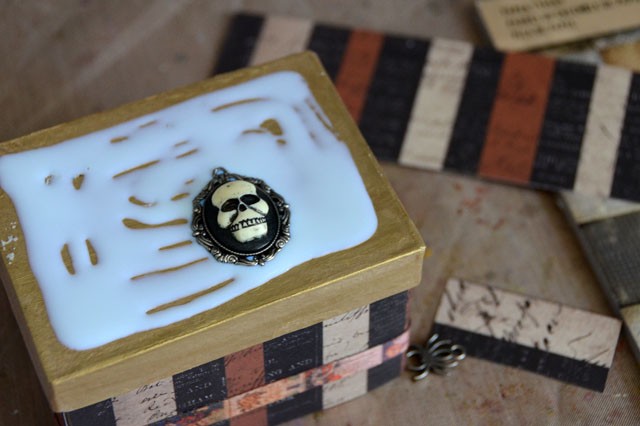
Start with a few big pieces…
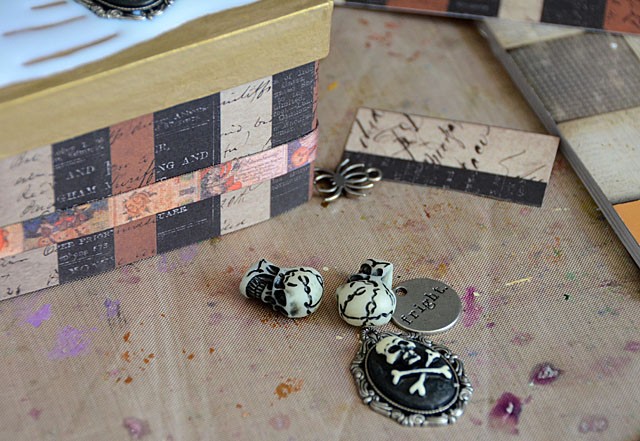
DSC_6491

add a few more…

DSC_6493

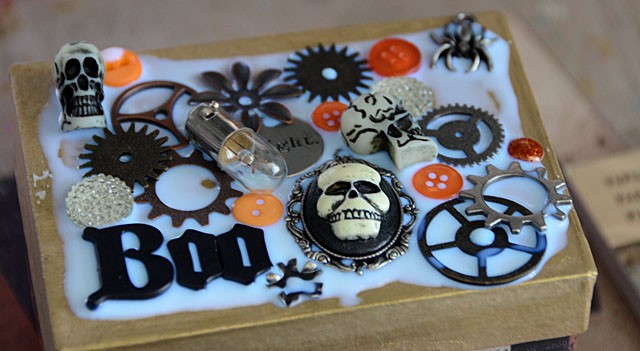
and then once you have the big pieces put in place, add little details!

DSC_6795 copy

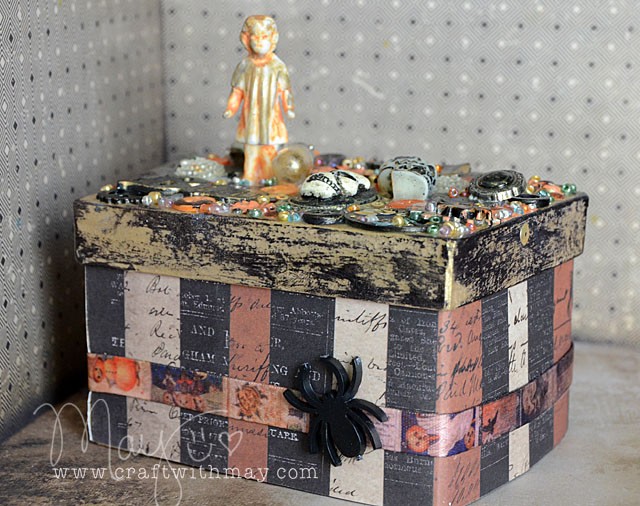
My “creepy” girl was altered by simply applying some orange paint that I wiped off, and then the same with gold. Just acrylic dabber paint from Ranger – no big thing. The black on the edges of the lid is just archival ink. While this project looks super intense and like a ton of work you’d be surprised how fun, quick, and easy these come together! I’m going to be sharing a video post of my process next month so that those of you who want the step-by-step process can see just how easy it can all be.

DSC_6802 copy

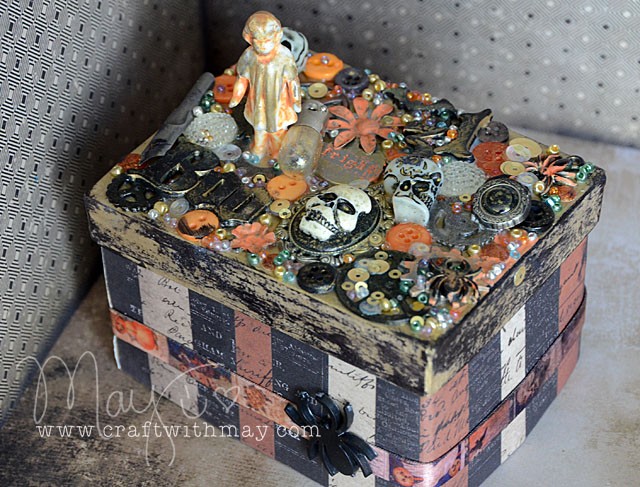
This has become a part of my décor for this year – I simply can’t part with it! It makes for a fun little addition and boy did I have a good time. Things are sure spooooky around here…

Looking to shop? I’ve got you covered – and thank you in advance to those who use my affiliate links used below. Costs nothing extra – just helps me keep the lights on and the free content coming! BlueMoonScrapbooking, Ellen Hutson, and Scrapbook.com carry most if not all of the supplies I used, and so does Simon Says Stamp.

Painting with Distress Ink on Gesso surface

Who likes painting with distress ink over a gesso coated surface?

This girl!

mayflaum_autumntag

I used the new Dina Wakley Stamps (affiliate links used) that are available at shops like Ellen Hutson and Simon Says Stamp. I also used Dina’s gesso, a wide variety of distress ink colors, my beloved Heidi Swapp gold mist, and of course some of the ever amazing NEW Tim Holtz phrase stickers. Of course I’m not going to just tell you how I did this, I’ll show you!

link to YouTube video

I hope you enjoy my tutorial – and try some painting with inks of your own!

Treat Yo Self (gift box)

Things are so wild around here this week – more than usual. The upside is, I’m cleaning out my files and realized I never posted this project that I created and adore. How could I?! Well now I am here to share – hope you enjoy.

DSC_7301 copy

With a glittered die cut at the center, I added buttons, glitter, and random do-dads to create the ultimate gift box. My base is just one of those cheap little alterable paper boxes you can pick up at any craft store. You guys – these are so much fun to make.

DSC_7316 copy

This die from Ellen Hutson (affiliate link) is just the best, and since ‘treating myself’ to it last month I can’t stop using it!

DSC_7298 copy

I’ve got spooky box coming next week, and you can also find me creating some Christmas versions next month – including a very merry video. So stay tuned – oh, and treat yo self to this die. Seriously a fun one!

don’t know the reference “Treat Yo Self?” well then you’ve not watched Parks & Rec (How could you not?!! one of the best shows out there…) so here’s a link to a YT that has the good snippets that should explain…

Fabric Elements by Rebekah Meier (project #2)

DSC_6135

Know what I love? Playing with color + texture + mixing my mediums. So when I got an email asking if I’d like to blog about the Rebekah Meier mixed media line? Sure thing! I wasn’t sure what would be in the package I was sent – but I was excited to try something new and embrace a new adventure. Today I’ve got a second project post to share with you. If you missed the first one about 5 weeks ago + the YouTube video tutorial you can check that out HERE.

DSC_7712

The products were developed by Rebekah Meier following the success of her books about Fabric Art Collage. There are 32 SKUS now on sale at Joann Fabric and Craft stores, and also a new book by Rebekah called “Techniques in Mixed Media” which shows step-by-step mixed media projects. The products include pre-cut substrates such as Wool Felt, Lutradur, Peltex, Batting, Waffle Muslin, Osnaburg, all in neutrals so that ANYTHING can be created. There is also tissue and stencils designed by Rebekah Meier as well.

DSC_7747

This time around I was inspired by the canvas tags and one of the new stencil designs. The tags come six to a package, and they really take color mediums well! For my tag I:

  1. Used one of the fabric elements stencils with texture paste, then sprayed entire tag with blue mist.
  2. Once dry, added a strip of the design in white crackle paste, let that dry. This is how I got so many of the design so close! Love to layer!
  3. Once dry, I inked with brown then coated entire tag with matte finish gel medium to give it some stiffness and to lock all the color in.
  4. Archival ink design stamped on, check! Now it’s just play time! Stitch, add stickers, add fabric elements trim, and top a gift bag!

fabricelements_mayflaum

I threw a bit of Fabric Elements tissue inside my bag just for fun – love that! Speaking of love – I just love how this turned out, and how this tag takes color!! My tag looks super complicated and full of rich color but it really only took a few steps. You know I love when a project works out like this.

DSC_7735

Fabric Elements Creative Challenge
Fabric Editions, Inc. wants to see how mixed-media artists can adopt and play within the new fabric substrates of the Fabric Elements product line. To kick off the product launch we are having a Creative Challenge using the Fabric Elements products. Each of the 20 finalists will receive a copy of Rebekah Meier’s book, “Techniques For Mixed Media”. The Grand Prize Winner will receive 1 of each the items in the Fabric Elements product line, plus a Fabi Sizzix cutter and 3 dies: Prize valued at $379.00 (no cash prizes). Click here for the full details on how to enter, and for more details on this line.

DSC_7733

The products are in Jo-Ann Fabric and Craft stores and on joann.com. Fore more Fabric Editions information check out: the blog, Facebook, Instagram, Pinterest, or Twitter

Thank you to Rebekah Meier for inviting me to play with these fabulous products!

Fall in love with this ScanNCut embroidery hoop

Disclosure: I am a paid consultant for Brother International Corporation and have received a ScanNCut from Brother to evaluate. However, the opinions expressed are entirely my own and based on my use of the product.

Cutting out my leaves using my ScanNCut, then ironing them to my fabric for this mini hoop proved to be quick, easy, and a great start to what I believe is going to be a thriving new direction! This is my first finished hoop (that I designed on my own) – and I’m loving it!

DSC_7043 copy

Of course I need to stitch the excess fabric behind – but I couldn’t wait to share this with you. I just am loving it too much! AS you can see I stitched in gold, green, and brown. Attaching a few items was fun and ties this into my existing mixed media style which I adore.

DSC_7047 copy

I have so many ideas still to share – one thing you can be sure is that I’ll be using my ScanNCut to cut out both designs from the machine and custom shapes for my future hoops. This sped up the process so much – no hand designing or cutting for me!

This was a 4″ hoop, but I believe next time I will aim much bigger maybe 8-1o”. Got questions? Or advice if you’re a seasoned expert in this craft? Let me know! I’m excited to learn and grow in a new creative area.