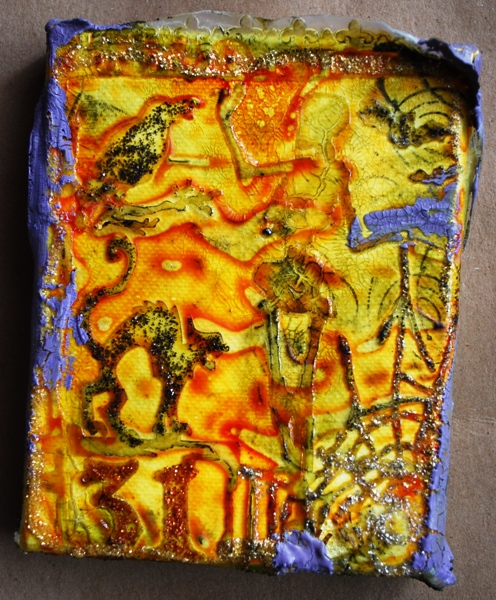
Yesterday I shared a video + idea for another way to use texture fades by Tim Holtz. Today I will share my first project with this technique:

I used the Halloween Night texture fade in this example. I LOVE this one and all the detail it has. Once dry and peeled (the embossed glue sheet, that is) I rubbed a 4×5 canvas with my Spiced Marmalade distress ink. Then I rubbed with liquid adhesive and set my ‘glue faux-fruit roll’ on top. The result? As it dried the ink pooled in a few spots and not in others, creating an uneven orange background behind the translucent glue. LOVE IT!

Then I stickled it to within an inch of it’s life. Ok, not really but you can see I used stickles glitters to accent the cat, number, web, and a few other details.

I also used some Dusty Concord distress crackle paint to accent some edges, and I applied Rock Candy distress crackle paint lightly to some areas – especially the skeleton. Once dry I rubbed over it with black soot to help make the cracks stand out. You might notice I let some edges of the glue sheet stand up. I was TOTALLY ok with that. Really I was just having some fun playing here – and in the process came up with another little home decor piece to add to my spook-i-fied house!!

You can probably tell I’m having a blast with Tim’s products. I really like that I’m finding more uses for them in my craft projects, and truly how easy they are to use and how everything works together.

Spooktacular! You’re going to make me get the glue out…
Thanks for showing a new technique to use with the texture folders. I love Halloween and this project was cool!
I am so thrilled to join you on the Ella Friends team. I look forward to getting to know you and to spending some time on your blog. And it looks like I’ll be here a while. Here’s to lots of fun…
Monika Wright
iloveitallwithmonikawright.blogspot.com
Just love it!!! And again with that Dusty Concord paint!!!
After a trip to Michaels, I’m going to give this a try!