ScanNCut Canvas: Converting an SVG file

DSC_5252

Disclosure: I am a paid consultant for Brother International Corporation and have received a ScanNCut from Brother to evaluate. However, the opinions expressed are entirely my own and based on my use of the product

Hey guys! So you know I do all kinds of things with my ScanNCut from using the built-in designs to doodling my own. One thing I have only done once or twice is to buy an .svg file and use that. Oh, but you can! So today I want to show you how quick and easy that is.

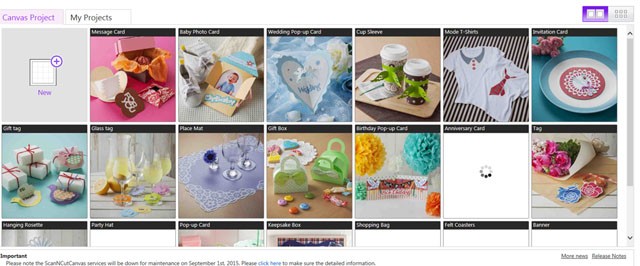
Brother has a (free) site known as ScanNCut Canvas where you can convert any .svg file to a file that can be read and cut by the ScanNCut machine. First you log in and this screen pops up:

2

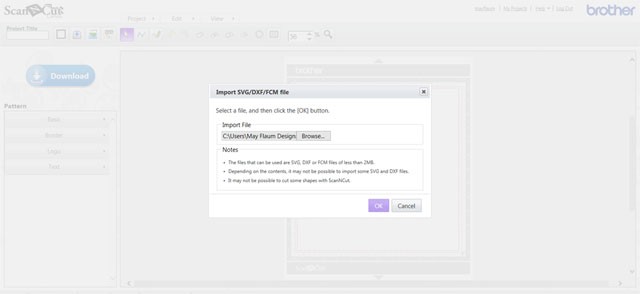
For today, we’ll click the “new project” at the top left and then click “import SVG” I never have to remember which button because SVG is right there on the screen.

4 copy

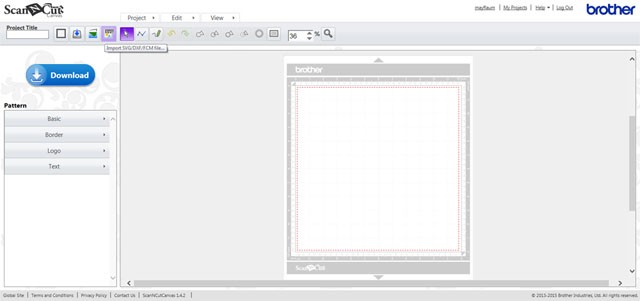
Next up? Import whatever file it is you’re wanting to convert.

7

Bam! There is my design. It re-sized automatically it because the original file was bigger than 12″ – great!

5

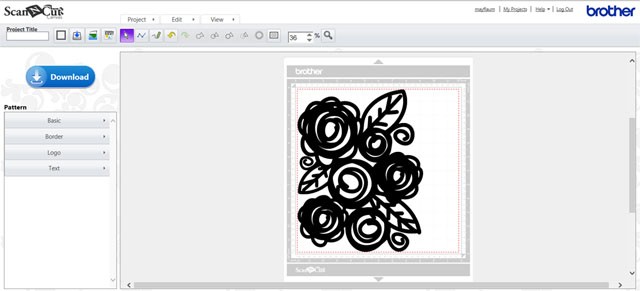
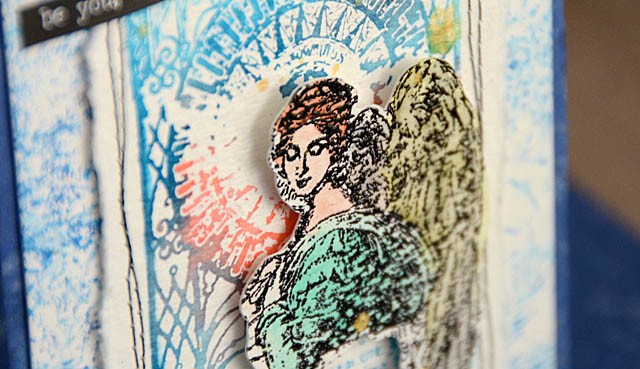
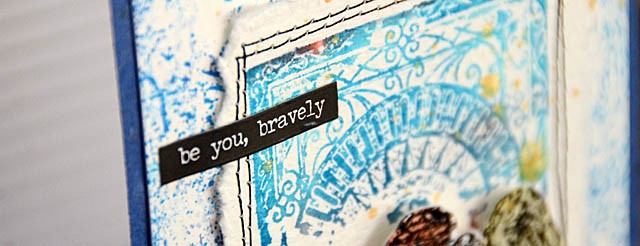
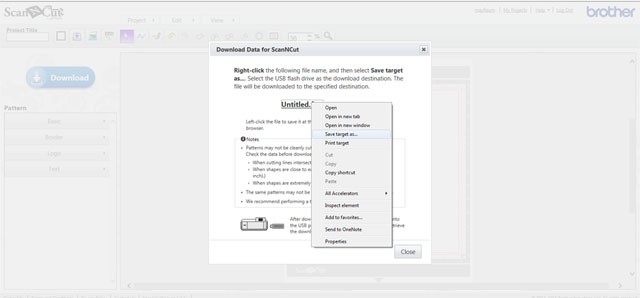
This file by Ashley Horton is perfection as-is so I am ready to save no edits needed. I will leave it this big – I can always size it down when cutting on the machine! So to save just click that big download button. You don’t have to remember this part – it’s all listed right there which I LOVE because I am never good at remembering tech stuff. Basically you just “save target as” and make sure you’ve got a USB drive in the computer so you can then name and save the file.

6

Then just take your USB drive and you can insert that into your ScanNCut! I don’t have any other .svg to convert, but if I had a number of those I think I’d do some in batches and have them ready to cut on my USB drive. The process took less than 2 minutes – super easy and I am glad because I am easy or not at all on this kind of thing!

DSC_5258 copy

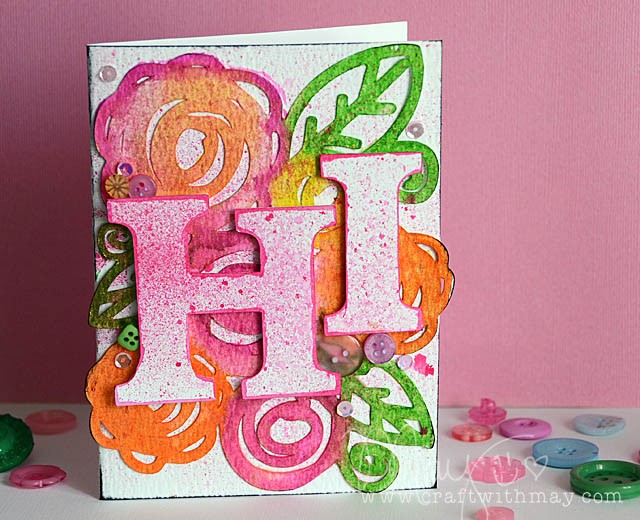
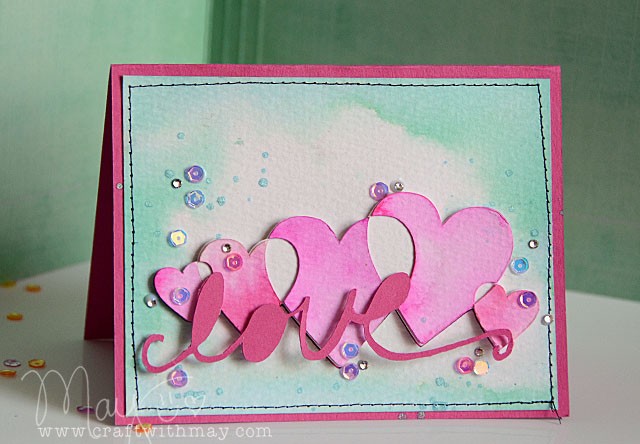
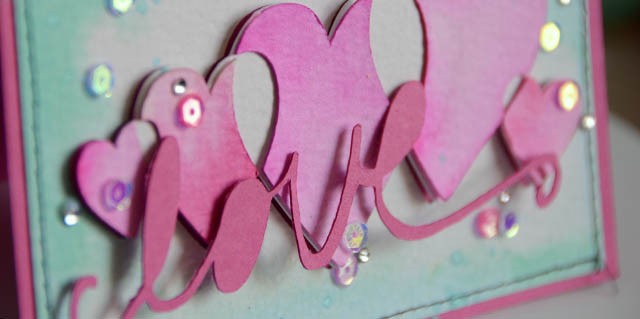
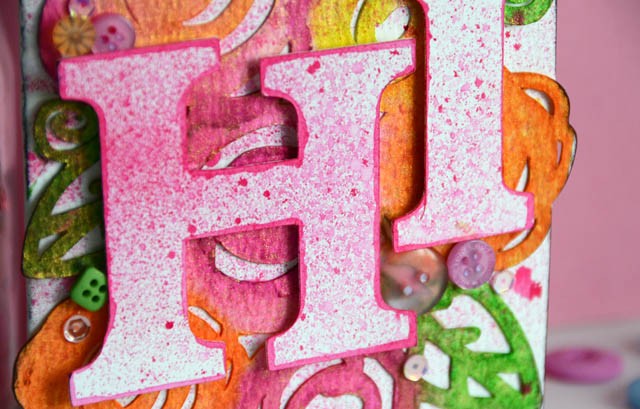
Here’s the card I made after cutting out the design (much smaller than saved version – about 4×6) watercolored and layered with a funky hi. So many possibilities… what shall I create  next?

Mixed Media Planner cover with Brother ScanNCut

Disclosure: I am a paid consultant for Brother International Corporation and have received a ScanNCut from Brother to evaluate. However, the opinions expressed are entirely my own and based on my use of the product.

DSC_4361 copy

The kids start school… next week. Crazy, right?! Almost as crazy as the fact that I have decided to throw it way back old school and get an “academic year” planner. It’s simple. Spots for each day in the week and a monthly page too. It’s not going to be fancy you won’t see stamping and decorating of these pages. 100% practical on the inside… so I decided to give it a little extra on the outside!


DSC_4365

I love watercolor paper for so many reasons – one of them being that I can easily build a whole embellishment off of it because it is so lovely and thick. I used my ScanNCut and one of my favorite designs on the machine to quickly build this dimensional accent.

Here’s a link to YouTube and the video I created sharing the entire process.

So quick and easy, and so many applications! From your workbook to your journal to even a basic and functional planner there is always something fun to be done, some way I can add my crafty touch.

ScanNCut card: Love those cut-outs!

Disclosure: I am a paid consultant for Brother International Corporation and have received a ScanNCut from Brother to evaluate. However, the opinions expressed are entirely my own and based on my use of the product.

DSC_3654 copy

Today I’m on my ScanNCut playing. Making shapes and experimenting with what does (and doesn’t) cut from the machine. Of course when experimenting I always try and actually make something! In this case a watercolored card is what turned up!

link to YouTube

DSC_3659

What I’m super into right now are projects like this that can be done with color mediums + cardstock. Something SO satisfying about starting with no pre-made embellishments or dies and just dreaming up the whole thing! I really like the layered look that I got with coloring some pieces and all the detail. Oh yes – and that “love” is just my handwriting cut on pink cardstock thanks to the ScanNCut.

What crafty projects are you into lately?

ScanNCut: Page template

Disclosure: I am a paid consultant for Brother International Corporation and have received a ScanNCut from Brother to evaluate. However, the opinions expressed are entirely my own and based on my use of the product.

DSC_3046

I was asked by my youngest if she could help make a scrapbook layout. This prompted me to think about my process, and how I could make a space for her to organize and set up photos, as well as place the embellishments as she wished while still making a page that was mine.

Tricky stuff!

Ultimately what I decided for a collaboration was that I would want to create a page template, then it was a matter of fill in the holes and decorate around the edge. Something simple does not mean something easy, sadly! Luckily my Brother ScanNCut was up to the task.

3

There were MANY trials. What did NOT work was drawing out all of the lines because obviously (to me, after having spent so much time working on it!) it would want to cut every single line! It *is* absolutely possible to do this using the wonderful Canvas program software (from Brother) – but for me to have pieces of paper I can move around and visualize was really a great way to approach this for the first time. For my brain and process- having something physical to work with really helped me work out the kinks! I will be trying this with the program as well and will report back.

I found that I didn’t like a thin border. I really wanted a thicker border around my photos for stability, and a good 2″ at least around the outside.

2

The best method I found to create my template was to lay pieces of black or very dark cardstock down onto a piece of white paper in the exact positions I wanted. I then scanned in the paper (see  below on right) and saved the design. I envision making a few designs like these! I made my photo holes 3 1/2 x 5 1/2″ at the maximum so that the photos could fit nicely.

Untitled-1

Once my design was scanned and saved? Well now I can cut it out as many times as I like!

DSC_3018 copy

Here you can see the photos behind my new page template. I love it! But I think a bit of stitching would be good…

DSC_3021 copy

With stitching and photos done, and journaling added it was once again time for kiddie fun! Miss Rebecca grabbed the glue and sequins and some epoxy accents and went to town.

DSC_3048

The finished result? A blend of her ideas and mine, and a layout we’ll treasure about the time we met our new dog!

DSC_3044

I am really excited by the idea that I can use my ScanNCut to crank out page templates for my kids so they can pick photos, place, and have an easy time figuring out where to put things. Some of these blocks could have been used for journaling as well. The only thing I will change for next time is I would have liked a thinner edge in the center between the photo columns. I didn’t need that to be quite so wide.

Overall though I’m really excited with how I can use paper scraps and do this. My final tip is to use a (unlikely to be used/wild color or pattern) piece of paper to mount your photos on for added stability for this kind of a page. In my case it was lime green 8 1/2 x 11″ cardstock and the difference was a lot of added strength for adhering things.

How the ScanNCut is rocking my stamping world

Scanning stamps with a simple outline using the ScanNCut is not only quick – it’s super easy! As much as I love doing this, I have long wished for a way to cut just part of an intricate image, or find a way to trick this machine into doing hard work for me.

DSC_2631

You see what once would have taken either a craft knife and a good amount of time not to mention little nicks and imperfections all over- now takes three things:

  • Transparency/clear plastic medium
  • black or bright pen thick enough to be picked up by scanner
  • A little tape

This is really game changing for me – and not only do I have a card to share with you today but I video taped the whole process/how-to. It’s a 15 minute or so video – longer than my usual YouTube but hey, that’s what it took! The thing is this took me oh, somewhere in the range of 8-10 hours to test, test, and test some more before I could get stuff just right. So much so that the original pen I had been using died I used it so much!

DSC_2632

Here is my full video tutorial explaining the process of getting your ScanNCut machine to recognize and cut just a part of your design (or a whole intricate design).


Link to YouTube

Here’s my finished card-

DSC_2624

How-to notes on the card:

  • white background is just dye ink applied to textured brayer and rolled on. Splatters of gold mist onto finished card
  • The stamped (colored) image is just multiple colors of ink applied and stamped onto watercolor paper
  • The angel is black embossed on watercolor paper. Colored with watercolor.

So much possibility – and now when I reference my “partial stamp cutting” you’ll know exactly how I did it!


Disclosure: I am a paid consultant for Brother International Corporation and have received a ScanNCut from Brother to evaluate. However, the opinions expressed are entirely my own and based on my use of the product.