So in the middle of planning Camp Scrap, taking a vacation, and working on my next on-line class something really cool happened. An opportunity I simply couldn’t say no to. Simon Says Stamp asked me to head up their vintage inspired challenge blog – aka Simon Says Stamp and Show. Each week there is a challenge and the design team shows their takes on the challenge as inspiration. So you can get inspired and join in – and if you share your project guess what? You get entered for the chance to win a $50 gift voucher to Simon Says Stamp! Pretty cool, right? All the details are over at the blog – where this week the challenge was ‘spritz, spray, or stencil’.
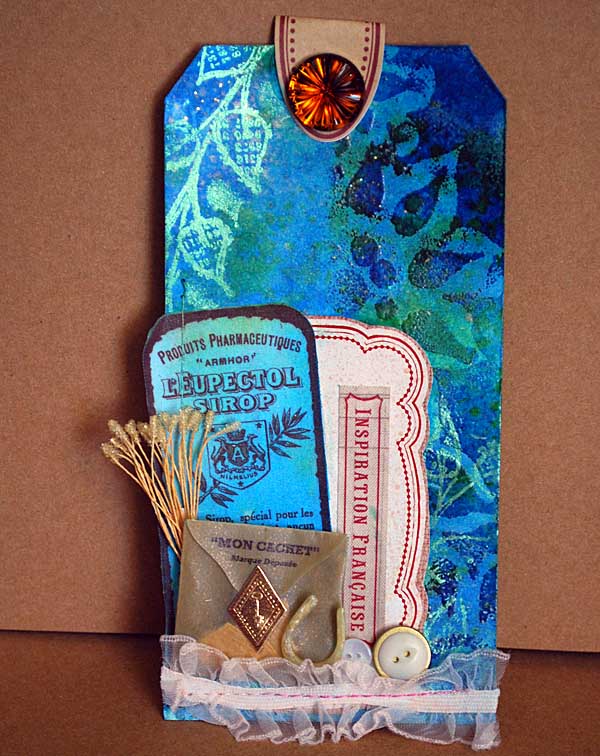
I couldn’t help but jump right in. Here’s the tag I created:

Ok, so first speaking of stencils and mists. Here is a link to my youtube video I did on Crafter’s Workshop stencils. Here’s another if you want to know more about things you can do with stencils. What about mists?
Things I do with mists:
* squirt directly onto project
* open bottle and use with paintbrush to apply
* squirt onto craft mat, then “stamp” into puddle and ink up my stamp then stamp with it!
* mix with paint, gel medium, or texture paste to colorize
* use with stencils
* put dylusions or mister huey in water brush for a juicy pen

I love and heavily use three kinds of mist:
Mister Huey for semi-opaque colors in (usually) muted tones
Perfect Pearls mists for NO color. Just droplets of pearly sparkle that doesn’t re-color your project
and, the kind featured today, Dylusions mists for color that is vibrant, sheer, blends, and reacts with water too.
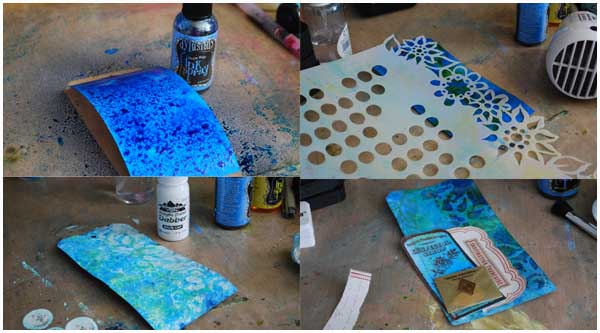
 1. Saturate tag with mist. Use stencil + other mist color. Spray whole thing with water to blend. DRY. I used yellow, which of course turned into green spots. (that was the idea!)
2. Place floral stencil at edge, rub embossing ink all along it until tag exposed is coated. Then apply embossing powder and heat set.
3. Apply white paint over the entire tag, working quickly. The dylusions mist will react with it and turn into a light blue/green. Rub off excess paint, especially on embossed area. The original vivid color will shine through those areas.
4. Apply perfect medium to leaf stamp, stamp around tag. Come back through and brush perfect pearls powder over stamped areas. Brush off excess.
5. Finish by adding embellishments, and misting of course with a bit of perfect pearls mist.

When looking at this tag, the embossing powder is the real trick here. It creates so much more depth by allowing me to have both very vivid and more soft color.

I wondered if it would work, combining my love of French General with that bold blue – but I think it does! Toning it down a lot with white paint really helps. Oh, and I ADORE the misted sprinkles of sparkle that my final step left all over my tag.
Here’s a supply list:
I hope you enjoyed my look at mists – if you have any questions please feel free to ask in the comments. I’ll be sharing more videos here in future on specific mist types, techniques, and more. I do love ’em! [and stencils, don’t even get me started I love them so much!]
Last thing – don’t forget to pop by Simon Says Stamp & Show to see the work of the amazing design team, and to get all the info on entering the challenge and all that good stuff!!
In the mood to shop? Long time favorite [and now a company I officially work with!] Simon Says Stamp always has a huge selection and loads of the latest and greatest paper crafting goodies.


Love the tag.
Great inky tag May, love the rich blue and those stencilled flowers. The striking blue looks beautiful against the softness of the ribbon trim. Beautifully embellished. Tracy x
This tag has so many wonderful elements. The colors, of course, but that sweet wee sealed envelope? Darling! And the ruffle border is the perfect finishing touch. Just gorgeous!
Great tag with so many layers! I love the way the colors interact and are so vibrant. I don’t have any Dylusions mists yet, but the more I see, the more I need the whole collection. Thanks for this great demo and congratulations on the chance to head the vintage blog for Simon Stamps. You will be an inspiration in every way possible.
I LOVE this and I’m totally inspired.I may even summon up enough courage to participate in the challenge.
LOVE it! Can’t wait to play in the studio today 🙂 Thanks for the inspiration!
Looks great! Congrats on the new partnership.
Love all the layers. You are truly a great source of inspiration and technique know how.
Love the colors on your tag. I have never tried Mr. Hueys or Dylusions but they both look great. I never thought to open a spray bottle & use a brush…duh! Thanks for the misting tips.
Stunning! Loved how you attached a label plus button at the top too.
May, your tag is beautiful. I love the deep rich blue tones of your background. All of your embellishments also pop against the blue. Nice blog post! Hugs, Candy
I will get busy with my mists. Finally got some Dylusions and Mr Huey at Scrapbook Island and haven’t cracked them open. Thanks for the great ideas!
Fantastic tag, May! I’m really loving the little bit of “wheat” and the bold blue mist is gorgeous!
*mwah*
Steph
Simon Says Stamp!
Great tag. Can’t wait to get started on my own. This is the first time I’ve had all the products listed.
beautiful tag, great colors
Such a pretty tag May. And congrats on the SSS job!
Wow, this tag is stunning! LOVE the background you created with the mist, stencil, embossing and paint. Fabulous colours and the little envelope is so cute.
I love the depth of the colors…so rich!
the blue and greens are so rich and beautiful – makes me want to mist something.
Gorgeous gorgeous color here! I love all the element on the bottom as well! Love the stenciled designs!
Amazing colours… I’ll have to look in to the Dylusions – seems like everyone has them, I’m starting to get envious! Thanks so much for all that detailed info on ways to play with all this stuff – great inspiration.