You’ve probably seen a paper pad from Die Cuts with a View (aka DCWV) in your local craft or scrapbook store. They’re thick. They’ve got multiple sheets of each design (or cardstock). They come in mat size + 12×12 and more. It’s a big stack of paper love, and they have a wide selection and new designs come out frequently.
It’s good stuff, and what makes it even more fun is every Friday in March (Hooray for National Craft month!) you will find a new project from me + a give-away right here on my blog featuring DCWV paper. Oh yes, they’ve sent me some paper to experiment with, and they’re going to send some love to one of my lucky blog readers each week too. [and if you’re counting, yep. 5 Fridays in March. WAHOO!]
So let’s dig in with my first layout with the Coral Couture stacks.

Aqua is always a favorite color of mine, and of course oranges (and coral) hues are super hot this spring so this is a very trendy pad indeed. What I like is that most of the patterns are small scale, the colors are really nice tones that look good with my photos, and it’s a versatile pad as well. For this first week, I wanted to do a sunburst layout. I’ve had “make my own paper sunburst patterned paper” on my to-do list for a long time, and this seemed like the time to try it. So here we go.
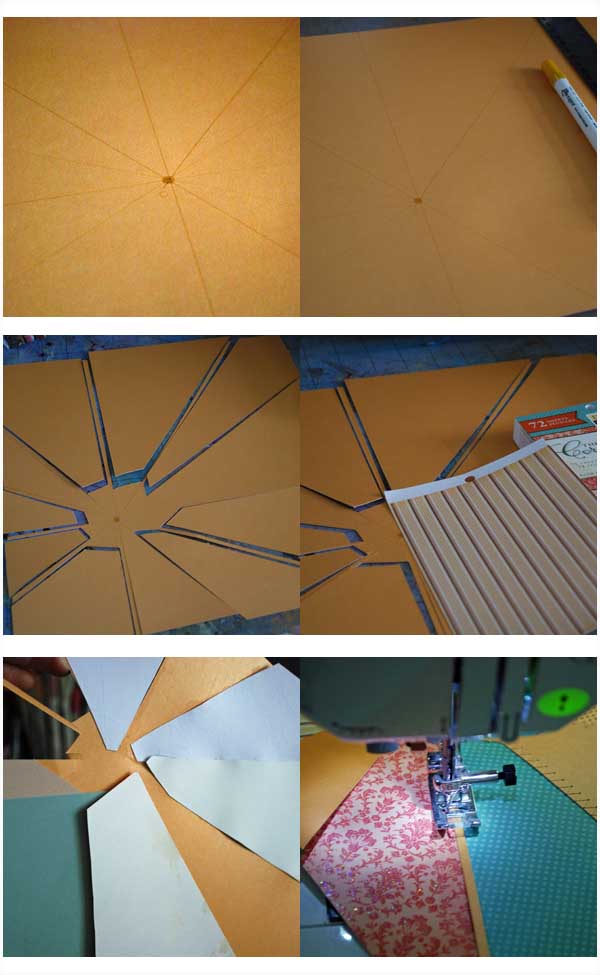
1. Draw a sunburst on your background. Do this with a ruler + pen. Mark some “center” for your sunburst (it does NOT have to be centered, just that’s the point you go out from). I suggest marking that spot on a place you intend to cover.
2. Go ahead and draw those lines! wide, thin, lots, just a few – totally your call.
3. Cut down along the lines, stopping an inch or two from the center point. At this point, you can cut a second line (thin ‘strip’) to help mark between papers, or if you did every other section your background paper, then you wouldn’t have to.
4. Start cutting patterned papers and cardstocks! You can cut to size using the pieces you just cut out and removed, or if you’re doing every other one instead, just cut it about the right size.
5. Once it’s all glued together, stitch a zig-zag stitch along the seams. Then trim edges (I needed to) and you’re ready to go! I ended up trimming mine down to 11 1/4″ square and then I mounted this onto another sheet of paper and stitched around the edges.

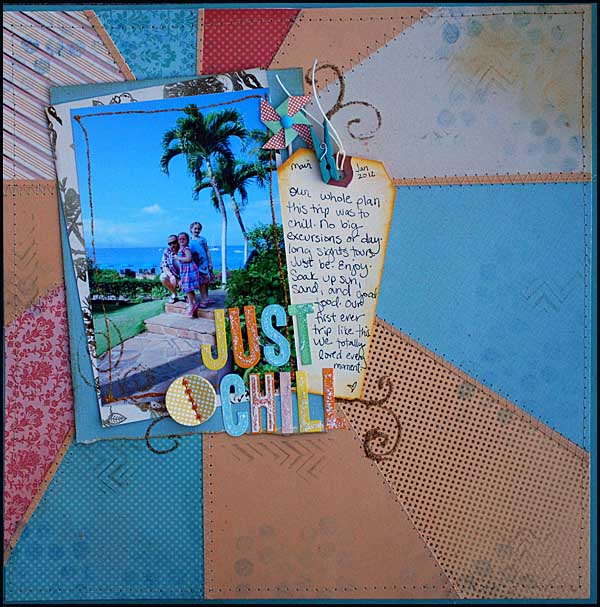
I used my ruler + a craft knife to cut my lines. I was able to have better control than with scissors as I don’t cut straight on my own well. Here’s the finished layout:

It was quite a bit of work, but not hard once I got things going. Just time consuming… and really fun.

I kept my embellishing simple with just a few pebbles embellishments (new Hip Hip Hooray line – matches great!) and some distress stickles.

I also used a few stamps (dots are just bubble wrap I inked + stamped) to add some funk to my sunburst.

I used papers from the coordinating mat stack to go under my photo – love that. I also really like the subtle texture of their solid papers and that there are glittered and foil papers as well as regular patterned paper in the stack. Another thing I love is how easily the colors and patterns blend with any brand of embellishments.

As you can see, these colors worked beautifully with my Hawaii photo. What else can I do with them? You’ll have to stay tuned to see!
Prize Time:
Would you like to win two stacks from DCWV’s latest collections? Leave a comment here to be entered for your chance to win. I will announce winner at the start of the next week’s DCWV Friday post. DCWV requests that entries be limited to within the USA.
Thank you DCWV for sponsoring these weekly give-aways! It’s going to be a super fun March ahead…
Supplies Used: