This week the challenge at the Monday Challenge blog is to use a Simon Says Stamp exclusive product (it could be a stamp, sticker – whatever!) and share. Simon is, as always, offering a generous $50 voucher that will be randomly drawn from the eligible entries each week. For your chance to win a $50 voucher you should hop on over and join in the challenge here.
 Of course this week we’re mixing things up – and to see all the projects that we’ve created you’ll have to hop around to the design team’s blogs. We’re all using the new Shari Carroll Art Journaling kit (you can get yours here in the shop) and you’ll want to see all of the creative things the team has come up with this week. First though, I’ll share my entry and to kick off my post here is a video made by Shari, so you can see what she has to say about the kit and see all of the contents:
.
What I’m going to do here today is show you how I took a beautiful, pristine, just out of the package art journal and got it all junked up and ready to party!

First thing… I decided to cut off the elastic band that would hold this closed. It was in the way of my master plan. Off it goes!

Next up: matte medium from the kit applied liberally under AND over the dictionary paper (also from kit). Let it dry, then sand those edges!

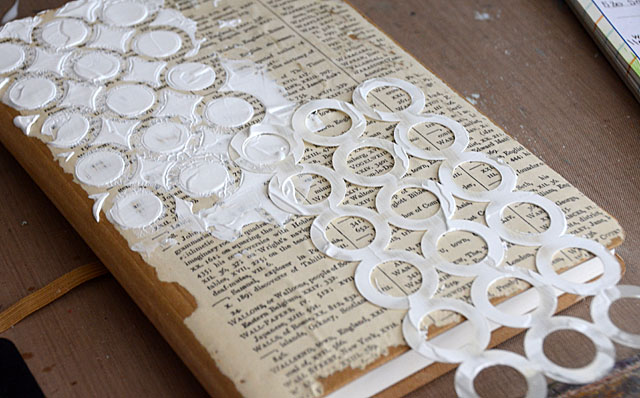
Now that we have a base, it’s time for gesso + stencil.

I liked using the scraper tool – and again to this point EVERYTHING I’ve used is from the kit – to apply the gesso. This will add a nice texture and I like this pattern as a base design.


Once that dries, it’s decorating time! I am pulling out the stamps from the kit (I had a pattern and a butterfly), and I’m using some Memento Luxe ink (not in kit) to stamp.

I think I’ll also get out some of that blue paint from the kit, apply it, and mist it down with water! (Why not?!)

Eh… maybe wipe it around a bit. Can you tell how specific and exact this science is?

That was fun, let’s get out the orange paint!

Scraped up fun.

I took that pink ink pad (that I used with the butterflies) and applied a bit at the edge as well as a few mists of water to make it bleed.

Then it’s just about finishing time! Adding in a tile, flower and letters from the kit (adhered with multi-medium)

And I think stamping a bit with the other texture stamp I had in the kit – loving the crackle look!

Guess what? The cover is now all funky and ready to hold my random doodles, ideas, and more!

I love how this turned out, and that I really didn’t add much at all to the kit. These little journals are FANTASTIC – I want to get a few more actually! You can find just the small journal here in the Simon shop. And again, here’s a link to the kit if you want to check it out for yourself. I love that they all come with different stamps!
Now that I’ve shared my creation, it’s time to “hop” on over to the next team member if you’re so inclined! The always creative Meihsia is up next, so pop over to her blog and see what she’s dreamed up.
Oh, and of course remember to head back to the Simon Says Stamp Monday Challenge blog to enter in the fun if you’d like to join in this week’s challenge.
Simon Says Stamp was founded in 2002 with an interest in exclusively selling rubber stamps. It didn’t take long until we realized we couldn’t stop there. During the past 11 years we celebrate rubber stamping in its full glory by giving access to people around the world to a one stop shop. Rubber stamps still remain the heart of our business and we are celebrating by hosting a STAMPtember® event intended to inspire, educate, and celebrate the greatness of rubber stamping. Part of the enticement of rubber stamping is that stamps can be used in creating or complementing ANYTHING! From stamping dates on bank documents and postage parcels in the early 18th century, rubber stamping has dramatically expanded to include card making, scrapbooking, mixed media, life documenting, art journaling, and many forms of altering and expressing art.

Love this May, your layers are amazing!!!
OMG … how wonderfully unconventional and playful you’ve created your masterpiece! A great stamp (I love butterflies) and a fabulous background stamp – so many types of use. TFS CU hellerlittle from germany
One word: Beautiful! xxx
You’ve used my favourite colours in which to create a great front cover. I wonder why different stamps appear in the kits and whether you have a say as to the ones you get.
Amazing! Love the colors & I need a scraper now 🙂
Now that is what an art journal should look like. 🙂 The mix of colors and textures is beautiful and the Be Creative the perfect focal point. Lovely!
I love how,you used the scrabble letter to add ‘B’ Creative, perfect for your cover. Love how,you used the scraper to add the paint, adding wonderful texture and dimension. Great colours too. The butterfly is gorgeous. Tracy x
Great cover!
looks fabulous May, love the clever use of the scrabble tile too. Love it.
Great colours and love the word made like that! Inky greetings, Gerrina
Really cool cover, May. Lots of great texture and color that you’ve achieved from our neat little art journaling kit! <3 Candy
Super cute journal, May! Love all the texture and pops of color you added to it 🙂
*mwah*
Steph
Simon Says Stamp!
Gorgeous cover May! Love all the great texture you got. That crackle stamp looks wonderful.
Wonderful art journal w/ layers & embellishments. Tim Holtz would be very proud of these creations.
Melissa
“Sunshine HoneyBee”
Beautiful cover. Love the textures and colors.
Beautiful Tutorial ! Love love love the colors !
Thankyou for this lovely creation
Hugs
Pj
lightboxcreative.blogspot.co.uk
You are simple amazing!!
Gorgeous journal cover May! I love your mix of colors and texture! So very creative! Thanks for sharing your creative process!
I’m learning so much along this fabulous hop. Gorgeous work May! Nicola x
Amazing artwork…love what you’ve done on this cover.
I wasn’t sure where you were heading at first, but I should have trusted it would turn out beautifully – and it did! Thanks for the step by step, I am going to be lifting parts of this for sure. . . Lol!
May I always love to see your ideas, thanks again for some beautiful work!
LOVE …
Lots of fantastic technique inspiration here. May’s style always inspires me.
Love it!!!
May, you are so amazingly creative. I love how you use a bit of this. Then add a bit of something else, and then do it again. Just like a chef creates a fabulous dish, you create art. What I love the most is how much fun you have when you create. Love it! Also would love to get this kit, but just added to complete my distress inks and some reindeers so there went my creative budget for this month. I guess I shall add the kit to my wish list and hope it does not sell out.
Omg such a great idea !!
Thanks a lot !!
Hugs from France
Lunea
Hello! Your project is lovely. I love the color combo and that ‘crackle’ stamp adds so much to the entire design. Great layering, very inspiring. TFS!
Beautiful journal cover. Love you’re design..great ideas. Thank you so much for sharing with us.
What a great cover for your journal. Love the colors and textures you used.
I LOVE it, simple yet fabulous! Right up my alley, okay well I am always hoping for fabulous lol. I am so in love with that journal design also, I have begged hubby to get me one, no such luck yet but I am still begging lol.
OMG! That is so cool!!! And now you make me want to funnel my Gesso into a cool little squirter bottle! LOL! I love the way the colors turned out and that cool stencil too!
Such a fabulous project. Love the colors and the base paper. Thanks for the inspiration
May, love your many layered work, yet with a simplictic style.
What a sweet journal cover, May. I love the beautiful textures on the background and “B” creative sentiment. 🙂
This is lovely.
Awesome great cover I love the colors and all the details. Thanks for the inspiration.
What a stunning cover! I love how you used bright colors to give it a vibrant feel, yet the colors blend so beautifully and softly because of the techniques you used. Wonderfully inspiring and I appreciate the clear step-by-step photos, too!
Great mixed media cover! fab work! barbarayaya
I LOVE IT
I LOVE IT
I LOVE IT
Pretty cover, May! Love the texture and the marbled/mixed colors. The B creative sentiment is perfect. Hugs, Sandra
Fabulous transformation of your AJ cover great textures and colour have fun with the pages
MaggieH
Really cute May!!
LOVE the sanding technique and the title!
This is amazing May, I love every detail!!! have fun inking up the inside too!
Great looking kit and I really love your journal cover May