
The other day I was at the craft store and 2 for $1 I found these little wood shapes – so much possibility! I could get crazy with clay or stenciling or all kinds of seasonal looks – but for today I wanted to make some simple houses for my holiday decor. From birdhouses to boxes I love decorating wood shapes with scrapbook paper!
Here are my tips for you:
- Determine if liquid adhesive is truly needed. Most often dry/tape runner works just fine!
- If you use liquid, place it paper side down and with a weight on top so you can get a smooth finish once dry
- Have FUN! As you can see below – I sometimes get wild with the buttons and things. Enjoy the process and think of it like a gingerbread house – but with crafty projects!
- Mix & match scraps to use them up
- Work out your ideas before getting the PPA (my fave liquid glue) and adding things like buttons and metal bits.
A few supplies aside from paper I like to use include: glitter glue, acrylic paint, metal charms, beads and jewelry making supplies, buttons, sequins, resin or enamel bits, stickers, and markers. There is no limit! To add texture get those stamps, pastes, or stencils out! Inks are welcome too.
When should you liquid adhesive coat your paper? Basically it should be when there is a need. For example if doing a lot of mediums over the paper coating it under and then sealing with PPA will help ensure that it doesn’t buckle or warp. Just use a light hand, and very light layers. Patience is key!
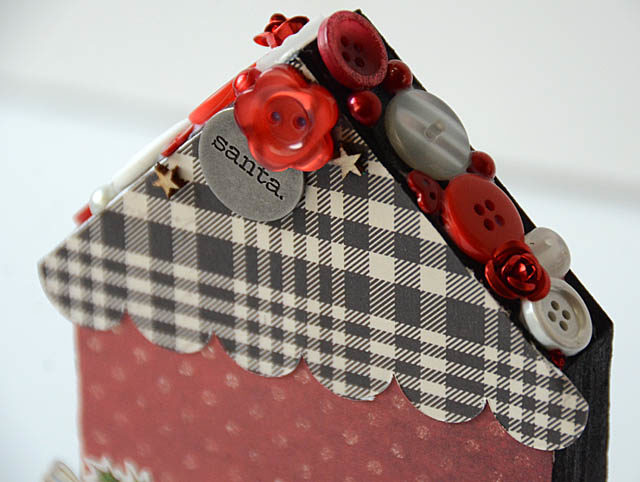
For a look at how I used my ScanNCut for my scallop roofs you can check out the YouTube video here. This is also a great project for paper punches, decorative scissors, and other tools rarely seen or used! Get things out and play!
All of the tips and ideas I’m sharing today will work on any wooden shapes from monograms to bird houses to boxes!
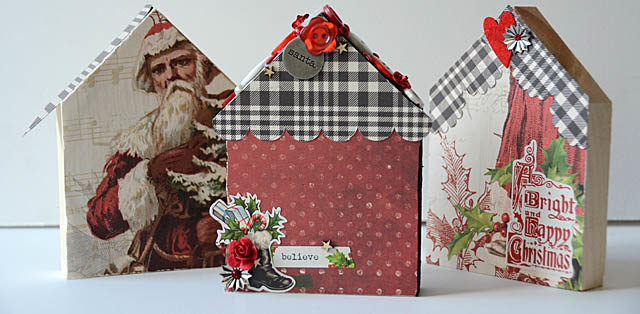
My final tip to you? This is a wonderful project to take on with not as crafty friends, or even older kids! Make it a holiday crafty party and have fun! I got enough of these houses so that the next time the girls have friends over I will have them work on some for Valentine’s Day or perhaps Easter! They’re great all year long – and yes! You could in theory keep it so simple that you remove and redo these wooden beauties. Enjoy! And be sure to share with me if you create some of your own!
Good Morning May,
I love this! What store did you buy the wood at? Was it just a local store to you or a chain? I like that you can stack these for storage! I gave away all my villages away because they took up so much room.
These are just so adorable May!